
With this tool, you can manage the worktimes of your employees.
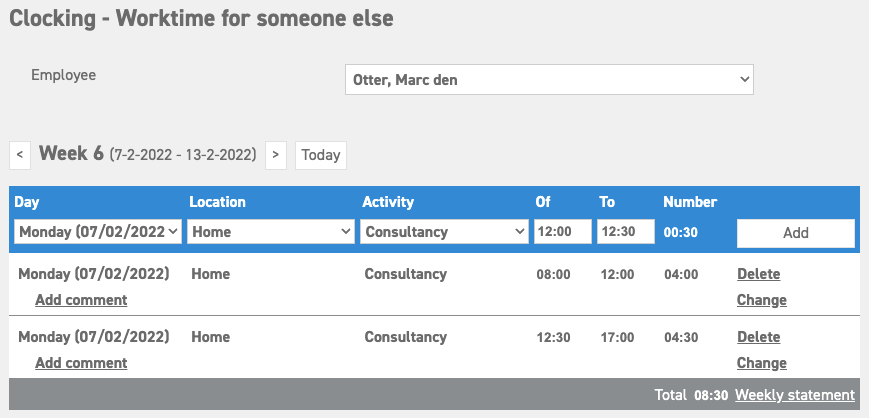
Go to ‘Time registration‘ ⇒ ‘Clocking’ ⇒ ‘Worktime for someone else‘. The window that appears gives an overview of the registered hours for that week.
At the top where it says ‘Employee’, select the employee of which you would like to register the worked hours in the drop-down list.
The overview
Above the calendar is a week selection bar. The week selected here will be the week of which the details are shown below, which can also be edited.
Below is a list of the options that are shown in the worktime overview, including an explanation.
- Arrow left / right: By selecting one of the arrow icons, the date will be moved to a week earlier (left) or a week later (right), depending on the week/day setting.
- Today: By selecting this option, the calendar will be centered on today’s week or day.
- Add comment: Use this option to add a comment to a work moment.
- Delete: By selecting this option, the work moment will be deleted.
- Change: By selecting this option, the work moment can be edited.
- Total: This shows the total number of hours that were registered this week.
Adding a work moment
To add a work moment, enter the following data in the blue section:
- Day: Select the day of which you would like to add the worktimes.
- Location: Select the location where the employee worked during that time.
- Activity: Select the activity that best describes the work that was carried out.
- Begin: State the time at which the work began.
- End: State the time at which the work ended.
Then select ‘Add’ add this work moment to the overview.
Submitting for assessment
When you have completed and added all the work activities for the week, you can submit the worktimes for assessment using the ‘weekly report’ button. You can also submit these via ‘Time registration’ ⇒ ‘Weekly Reports’ ⇒ ‘Weekly Report’.