
Click here to read more about assessing requests as a manager.
Authorization+
This is only applicable when the ‘Authorisation+’ module is activated.
The standard setting in the application is that the manager who is linked to the employee (which can be viewed and edited in the edit employee screen) will be the one to assess the requests of said employee.
The Authorization+ module offers the possibility to decide per type of leave or for a certain group of employees that multiple managers can assess the requests. The assessment progress of the request(s) will be visible, so that the employee can see who exactly still needs to assess the request, and who has already done so.
This way, it is possible to determine that the employee’s manager as well as an HR manager has the obligation to assess the request. This may be beneficial in the case of special leave, for instance. In another example, it is possible to determine that the manager of the department as well as the manager who schedules the leave days both have to assess.
Settings
In order to create an authorization flow, go to ‘Settings (gear icon top right)’ ⇒ ‘Master data’ ⇒ ‘Authorization+’ in the menu on the left. A screen will pop up with an overview of all the previously entered authorization flows. Select the button “add” to create a new authorization flow.
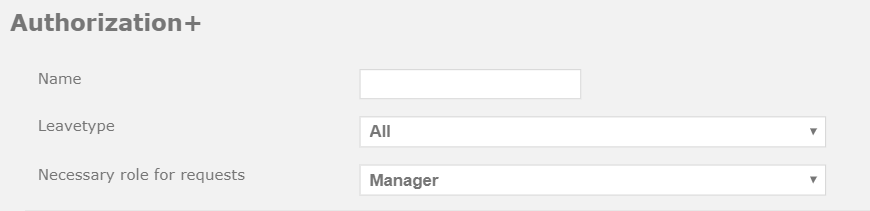
An authorization flow is constructed of multiple elements: a name, a type of leave that applies to this specific flow, the flows themselves, whether this flow should only be used for registering overtime, and who this flow applies to.
When entering a name for the flow, it is advised to consider a name that makes it easy to recognize the function and authorizers of this flow. The name can be up to a maximum of 50 characters and has a minimum of 1 character.
In selecting the type of leave, you can choose from the types of leave that are available for the administration you are signed into.
Attention! If you select ‘all’ when choosing a type of leave, you will still have to link the authorization flow to the employee in question in the edit employee screen. At the bottom of this page, the ‘all’ option will be explained fully.
In the ‘Authorization flow for New requests’ section, you can create the authorization flow which will be used in the case of a new request. Add an authorizer using the dropdown.
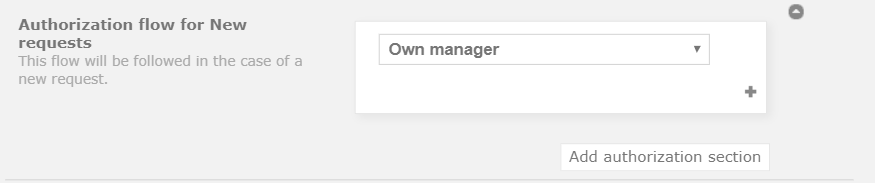
There are five fixed options for this:
- Own manager
Selecting this option means that the personal authorizer (manager) of this employee has the task of assessing outstanding requests. - Administrators
Selecting this option means that all of the administrators in the administration of the employee for whom this request has been made have the task of assessing outstanding requests. - Select a manager
Selecting this option will cause a second drop-down bar to appear. This menu contains all of the managers in the system. Select the manager that has to be added tot this authorization flow. The selected manager now has the task of assessing outstanding requests. - Select a department
Selecting this option causes a second drop-down bar to appear. This drop-down bar contains all departments. Selecting a certain department means that all of the managers within that department have the task of assessing outstanding requests. - Auto approve
Selecting this option means that al requests of the chosen type of leave do not need to be approved. This way the autorization will be skipped.
Enter one of the options mentioned above. You can decide to add another authorization section by selecting the button ‘add authorization section’. This new section will be shown underneath the existing one. This creates an “AND” situation, meaning that both authorizers in the authorization sections have to approve the request before it is approved. If one authorization section contains more than one authorizer, only one has to assess. Multiple flow-lines makes for multiple assessments.
Within one authorization section, it is possible to select the plus icon (+). Upon this, a new line appears under the existing one, which creates an ‘OR’ situation. In an ‘OR’ situation, one of the authorizers has to assess the request before it is approved or declined.
You can easily delete a line by selecting the cross icon (x) behind the line in question. If you’ve accidentally deleted the wrong line, you can recover it by selecting the “undo” symbol.
At “Necessary role for requests” you must select to which role the authorization flow applies, and for which type of user (which role) the type of leave is visible in the requests screen. To make it apply to everyone, select employee as the necessary role.
Authorization flow for changes in Approved requests
In the ‘Authorization flow for changes in Approved requests’ field, an authorization flow can be added which will be used when an already approved request is changed. There is no standard flow defined for Approved requests. In that case, when an approved request is changed, the flow for a new request will simply be followed.
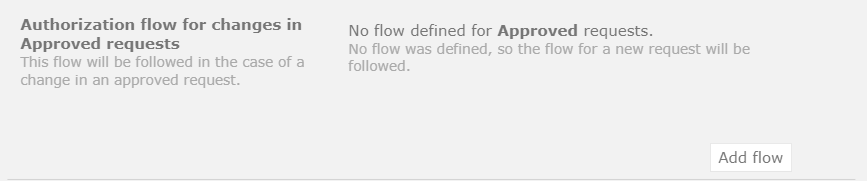
Should it be desired that a different flow be followed when changes are made in approved requests, a new flow can be added here by selecting ‘Add flow’. This may be useful when, for instance, a new request needs to be approved by three managers, but a change in the request need only be approved by the employee’s own manager.
This flow contains the same options as the aformentioned flow for new requests.
It is possible to delete the flow by selecting ‘Remove flow’.
Authorization flow for changes in Rejected requests
In the ‘Authorization flow for changes in Rejected requests’ field, an authorization flow can be added which will be used when a rejected request is changed or cancelled. There is no standard flow defined for Rejected requests. In that case, when an approved request is changed, the flow for a new request will simply be followed.

Should it be desired that a different flow be followed when changes are made in rejected requests, a new flow can be added here by selecting ‘Add flow’. This may be useful when, for instance, a new request was approved by two managers, but a third manager decides that one day in the request cannot be granted. Then it can be decided that only one manager has to approve the change.
This flow contains the same options as the aformentioned flow for new requests.
It is possible to delete the flow by selecting ‘Remove flow’.
The procedure of an authorization flow
Situation 1
In situation 1 we will look at the following authorization flows:
Own manager
AND X, Manager (select manager)
After submitting a request, the authorizer (manager) of this employee will have to assess this request. The authorizer will be alerted of this outstanding request via email. After the authorizer has approved the request, an email will be sent to manager X, with an outstanding request to be assessed. Only after the second approval will the request really be approved. If the first authorizer declines the request, there will be no task for the second authorizer, and no email will be sent. If the second authorizer declines the request, the request will be fully declined, even though the first authorizer had approved.
Situation 2
In situation 2 we will look at the following flow-lines:
Department 1 (select department)
OR administrators
After a request has been made, all of the managers in Department 1 will receive an email that there is an outstanding request for them to assess. The administrators will also be alerted via email that they have an outstanding request that needs to be assessed. If one of these authorizers approves the request, the request will be fully approved. If one of these four authorizers declines the request, the request will be fully declined.
Situation 3
In situation 3 we will look at the following flow-lines:
Own manager
AND Z, Manager
OR administrators
After a request has been made, there will be an outstanding request for the employee’s own authorizer. S/he will be informed of this task via email. After the authorizer has approved the request, manager Z and the administrators will receive an email that they have an outstanding request that needs to be assessed. When one of these authorizers approves, the request will be fully approved. If the first authorizer declines the request, no new task will be made for the other manager and administrators, and thus, no email will be sent.
When the administrators or manager Z declines the request, the request will be fully declined, even though the first authorizer approved the request.
Select certain users for the authorization flow via “all” types of leave
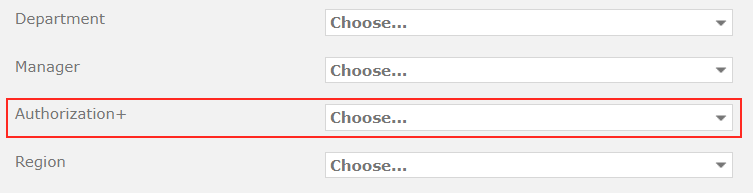
It is also possible to link an authorization flow to just one specific employee or a certain group of employees. To be able to do this, is important that the authorization flow is set to ‘all’ types of leave.
This way, you can link authorization to employees in the edit employee screen.
To link the authorization flow to a specific employee, go to ‘Settings (gear icon top right)’ ⇒ ‘Users’ ⇒ ‘Overview’, and select the employee in question. At ‘authorization flows’, select the desired authorization flow. This drop-down menu will only show the authorization flows that are set to ‘all’ types of leave.
Then select ‘save’.
Attention!
- Only use the ‘all’ option when you wish to use a selection of users. In case you wish to make an authorization flow for all employees and for all types of leave, it would be better to create a new authorization flow line for each type of leave. This means that there are just as many authorization flows as there are types of leave.
- An authorization flow that is set to ‘all’ types of leave always supersedes authorization flows that apply to all employees.
- An authorization flow that is set to ‘all’ types of leave will only become active when it is selected in the edit employee screen of a specific employee.
Changing an authorization flow
In order for you to change an authorization flow, go to ‘Settings (gear icon top right)’ ⇒ ‘Master data’ ⇒ ‘Authorization+’ in the menu. You will then see a screen with an overview of all the authorization flows. By selecting the icon of the little pencil next to the authorization flow, you will be able to change the settings and details.
After selecting the little pencil, a screen will appear that is identical to the screen you see when you first create an authorization flow. The only difference is that all the fields are already filled in, according to the current settings of this authorization flow. The same rules apply to changing a flow as they do to creating a flow. After you have edited the flow, press “save” in order to save all the changed details.
Already outstanding requests will NOT change when the authorization flow is altered.
Deleting an authorization flow
In order for you to delete an authorization flow, go to ‘Settings (gear icon top right)’ ⇒ ‘Master data’ ⇒ ‘Authorization+’ in the menu. You will then see a screen with an overview of all the authorization flows. Select the “trash” icon. A pop-up will appear asking you whether you want to delete the authorization flow. Select “delete”.
Already outstanding requests will NOT change or be deleted when the authorization flow is deleted.
Click here to read more about assessing requests as a manager.