
Click here if you want to know more about choosing colours for different types of leave.
Types of leave are the building blocks of employments.
Types of leave
In the ‘Types of leave’ menu item (‘Settings (gear icon top right)’ ⇒ ‘Master data’ ⇒ ‘Types of leave’) , you can determine which types of leave will be used in the system. This does not necessarily mean that all types of leave have to be linked to all employees. Types of leave can be seen as the building blocks of an employment, and can thus be added to specific employments. Every employee is linked to a certain employment, and thus will automatically also be linked to the types of leave as specified in the employment. This way, it is possible to link existing types of leave to different employees whose employments can have a totally different construction
What is a type of leave?
Types of leave are the building blocks of employments.
A type of leave can be requested by an employee when s/he asks for leave, and each type of leave has a different leave balance. This way, you can distinguish between types of leave, such as taking a day off as opposed to visiting a doctor. Most companies do not deduct leave balance for going to see a doctor. The different types of leave can be seen as many different ‘leave depositories’. The depository for your day off depends on the type of leave you would like to take.
This also applies to ‘time off in lieu’. The hours of overtime worked by an employee can be converted into time off in lieu. Has the employee made overtime? This time will be added to the ‘time off in lieu depository’. When there are enough hours in there, a new leave day will become available. By having a separate category for ‘time off in lieu’, you can keep tabs on how much overtime your employees withdraw. Time off in lieu has a different expiration date than other types of leave. The expiration date depends on the rules you have set within your company.
Building blocks
Types of leave are linked to employments. Different employments can contain a different combination of types of leave, so that not every employee is necessarily linked to every type of leave. Employees can only use types of leave that are added to the employment to which they are linked.
Why the different types of leave?
The numbers tell the tale!
By distinguishing between different types of leave, you can keep a clear overview of absences among your employees, and it also makes your end of year report more orderly and clear. Should you add the ‘doctor’s visit’ type of leave, it is possible to see how much time your employees have spent on going to the doctor’s at the end of the year. The same applies to sick leave, or any other type of leave. This information could be very beneficial to your company.
Settings per type of leave
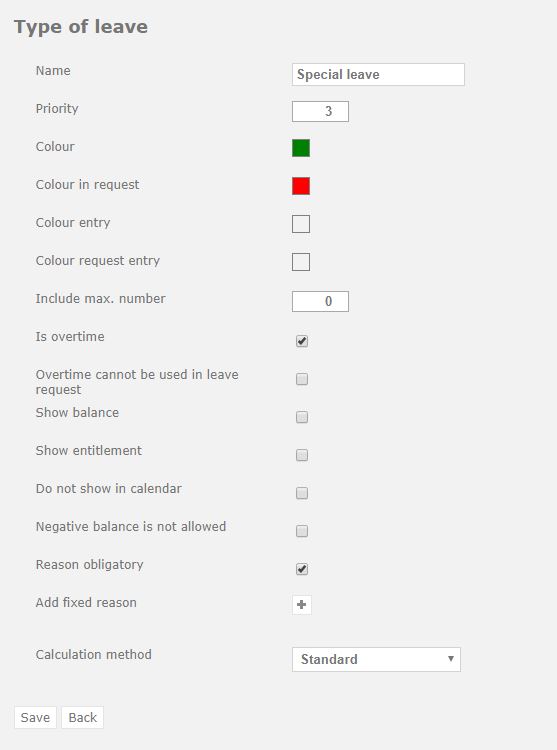
To adjust the settings of the types of leave, go to ‘Settings (gear icon top right)’ ⇒ ‘Master data’ ⇒ ‘Types of leave’ and select the little pencil icon next to the type of leave in question. To add a new type of leave, select ‘insert’.
At ‘Name’, fill in a suitable name for the type of leave.
At ‘Priority’ fill in the priority level this type of leave this should have, and thus which position this type of leave should take in the overview.
At the colour options, fill in the colours with which the type of leave will be shown in the calendar summary. You can decide on colours for each status.
At ‘Include max. number’ you can fill in how many days of this type of leave can be transferred to the next year. You can fill in any number of days here. If you fill in ‘-1’, this number will be unlimited. If you fill in ‘0’, left-over balance from this type of leave will not be transferred to the next year.
At ‘Is overtime’, you can select whether this type of leave counts as overtime.
‘Overtime cannot be used in leave request’ is used to prevent this type of leave from being shown when an employee is making a leave request. This way, employees can acquire overtime for this type of leave, but they cannot request leave in exchange. This option could be used when overtime hours can only be paid and cannot be used for leave.
Attention! This option will only become visible once you have selected the ‘is overtime’ option.
At ‘show balance’ you can select whether this type of leave will show credit – meaning the number of hours that still can be requested – in the balance summary. This credit will be shown in the third column of the balance summary.
- It is also advisable to turn this functionality on when it comes to types of leave with credit, if you want to have an overview of the total credit. This means that normal leave, days in lieu, and reduced working hours are all separate stores of leave. It is possible to show a total of these balances in the overview when this is functionality is turned on. You can turn it on in the system settings.
At ‘Show entitlement’ you can select whether or not to show the balance in the balance summary. The balance is shown in the first column of the balance summary. If you tick this box, either a positive or a negative number will be shown here, to represent the balance of this type of leave. In case you check the ‘show credit’ box, this type of leave will also become available for the leave balance report, because it has then turned into a type of leave with entitlement.
At ‘Do not show in calendar’ you can select whether or not this type of leave will be shown in the calendar summary for other employees than the employee him/herself. This may be preferable in the case of doctor’s visits, for instance.
‘Negative balance is not allowed’ can be used to prevent this type of leave from getting a negative balance. When the balance runs out, no more leave of this type can be requested by the employee.
- This option does not have to be turned on when the type of leave in question does not have a balance!
- If it is allowed to go into negative balance, the amount below 0 will be deducted from the new leave balance in the next year during year processing.
The option ‘Request per’ allows you to fill in the minimum amount for making a request for this type of leave. This can be per minute, per 2, 4, 6, 8 hours, per shift, or per day. Request per can be found Settings (gear icon top right)’ ⇒ ‘Leavedays’ ⇒ ‘Request per’ and select ‘add new rule’.
- Per hour: This means leave can be requested per minute. Use this option when you want employees to be able to request leave for an hour or fifteen minutes.
Shift: The system will look at the schedule to determine the shift.
Day: Only full days can be requested.
2, 4, 6, or 8 hours: Leave can be requested in periods of 2 hours.
At ‘Reason obligatory’ you can select whether or not an explanation has to be filled out in the ‘reason’ text box, before the request can be made. This option is often only used for special leave. If you do not turn this option on, employees still have the chance to fill in a reason, but it is not obligatory.
‘Add fixed reason’ is used to set default reasons for requesting this type of leave. When the ‘reason obligatory’ option is selected, fixed reasons can be added. Extra reasons can be added by selecting the plus sign. It is possible to add an unlimited number of reasons. Reasons can be deleted by selecting the cross sign.
At ‘Calculation method’ you can choose which calculation method will be used in calculating this type of leave. You can select the 2012 legislation, the standard calculation method, or ‘transport statutory leave 5 year valid’.
- All types of leave should have the option standard, with the exception of normal leave, if you decide to use the new legislation. Use the 2012 legislation if you wish to make use of the expiry rules of statutory leave (expires first of July of the next year) as well as exceeding statutory leave (expires after 5 years).
- Use transport statutory leave 5 year valid when you only wish to use the expiry rules for the leave exceeding the statutory minimum. Read more about the 2012 legislation on leave and the calculation method that is employed here.
In case you are using the LeaveSale module, it is possible to use the ‘Can be sold’ option. This means that the balance from this type of leave can be sold. You can hereby also decide whether a manager first has to approve the request when an employee wants to sell leave.
‘Expiry date for next salary calculation’: this option is only available when you are using the LeaveSale module. Enter the day of the month on which employees have the final opportunity to request leave sale, whereby any requests after this day will be added to the next month’s total. This way, you can make sure that employees stick to the deadline for selling leave to accommodate the salary administration.
Click here if you want to know more about choosing colours for different types of leave.