
Click here to read more about reportage possibilities for managers.
Click here to read more about reportage possibilities for administrators.
Attendance
Through the attendance report, an overview can be generated of the attendance of one or all employees at the same time. At the end of the year, it may be necessary to create a report for a year review or accountant. The attendance report can be created by going to ‘Time registration (top of the page)’ ⇒ ‘Report’ ⇒ ‘Attendance’.

Setting filters
- Start period: Choose a start date. Attention: the system calculates the attendance until the selected date. If you select the middle of the year (30-06-XXXX), it will only take into account half of the total attendance in the overview.
- End of period: Choose an end date. Attention: the system calculates the attendance until the selected date. If you select the middle of the year (30-06-XXXX), it will only take into account half of the total attendance in the overview.
- Employee: Select the employee of whom you would like to see the attendance. If you wish to see the attendance of all employees, leave this setting on “please select”.
- Manager: Select the manager of whose employees you would like to see the attendance. If you wish to see the attendance of all employees, leave this setting on “please select”.
- Department: Select the department of which you would like to see the attendance. If you wish to see the attendance of all employees, leave this setting on “please select”.
- Employment: Select an employment to filter on employees who have this employment. If you wish to see the attendance of all employees, leave this setting on “please select”.
- Inative employees: Check this box if you also wish to see the inactive employees.
As soon as you have entered all the necessary filters, select export. The ‘Export’ button will download the report, after which you can open the file in MS Excel, or send the file to someone.
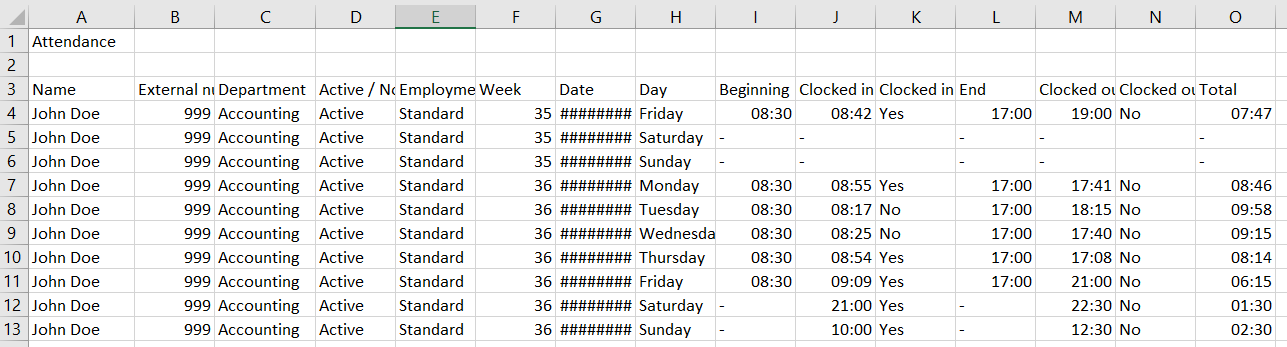
Above is an example of an exported attendance report. At the top are the different headings such as Name, External number, Department, etc.
Name: The name of the employee.
External number: Should your company employ external numbers, it can be found here.
Active/Not active: This shows whether the employee is active or not.
Department: If you have created departments in your Leavedays environment, this column will show which department the employee is part of. This might be useful when you want to filter your file on department.
Employment: Here you will find the employment of the employee.
Week: This is the week number.
Date: This shows the date of the work times.
Day: This the day of the work times.
Beginning: This shows the time the employee was supposed to start working according to the schedule.
Clocked in at: This is the time the employee actually clocked in.
Clocked in late: This shows whether the employee was late clocking in (yes) or not (no).
End: This shows the time the employee was supposed to stop working according to the schedule.
Clocked out at: This is the time the employee actually clocked out.
Clocked out early: This shows whether the employee was early clocking out (yes) or not (no).
Total: This shows the total of worked hours of the employee.
Click here to read more about reportage possibilities for managers.
Click here to read more about reportage possibilities for administrators.