
Click here to read more about creating schedules with multiple different weeks.
Click here to read more about inserting small (coffee) breaks in the schedule.
Click here to read more about flexible schedules
Schedules
Schedules validate the number of hours in a request for leave, and allow you to see when you and your colleagues need to work in the calendar summary.
schedules serve to indicate when employees work and how many hours this would be in the case of a request for leave. This prevents employees from requesting more hours than there are in their actual schedule.
A standard schedule is created for employees who have the same schedule, such as full-time employees. Multiple people can be linked to the same schedule. It is advisable to create a new schedule for every part-time employee in the system, unless there are multiple part-time employees who have the same schedule.
It is also advisable to give the schedule a recognizable and logical name. For instance, if the schedule in question contains a day off on Friday, the schedules name could be ‘Friday’s off’ or ‘8 8 8 8 0’, in case you also want to put down the number of hours. A schedule can be used by multiple employees; we therefore strongly recommend creating a new schedule when a change occurs in the schedule, instead of editing an existing one. Changes affect the schedules of all the employees linked to it, also with retroactive effect.
When a new employee is added to the system, they should always be linked to an applicable schedule. Make sure that your schedules are all set before you add employees.
Create a schedule
- To create a new schedule, go to ‘Settings (gear icon top right)’ ⇒ ‘Master data’ ⇒ ‘Schedules’.
- Create a new schedule by selecting ‘Insert’. The following screen will appear:
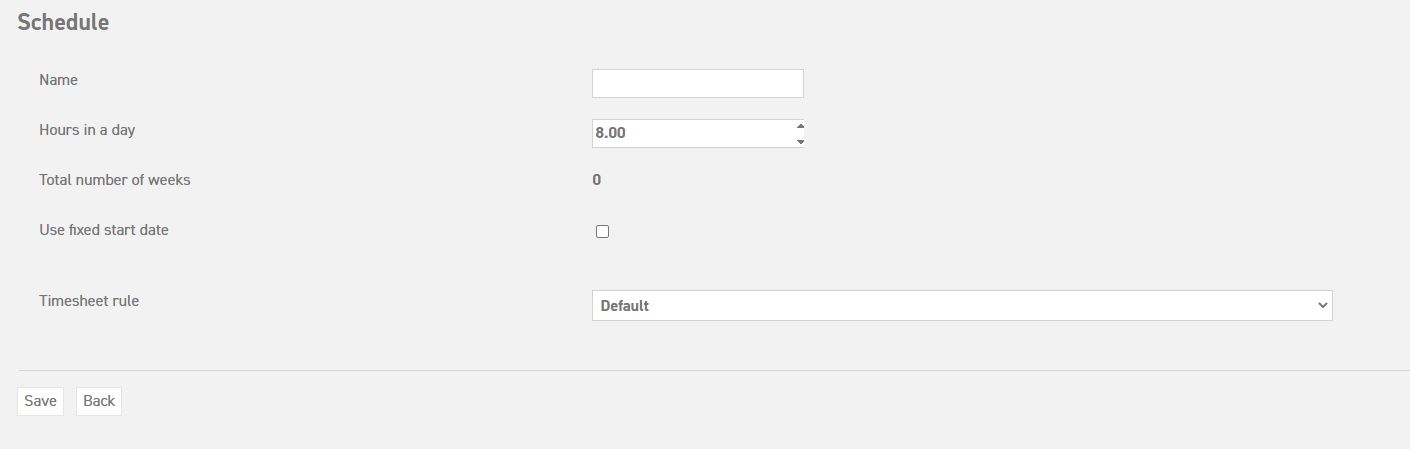
- Give the schedule a distinguishable name. The standard number of hours in a day is 8. Should your company have a different standard, you can enter it here.
- The standard starting date of the schedule is the start of employment date of the employee who this schedule applies to. For a schedule with multiple weeks, it is possible to select a fixed starting date for the schedule instead. This way, week 1 will start on the same date for all employees to whom this schedule applies. This is especially convenient for companies who work with night duty and/or shift work. Read about adding a fixed starting date in the case of schedules with multiple weeks. Do not use this option if the start date of the first week of the schedule should be equal to the start date of the employment.
- Then select ‘Save’.
The schedule has now been added to the schedule overview. It is still necessary to enter the works days to the system. To do this, select the schedule detail (page icon) of the schedule you have just created.

- In the schedule detail, you will see that the standard work hours of the first week are set according to the standard. Adapt the work times to fit the schedule you want for the first week. You can do this by selecting the pencil icon next to each individual day. Fill in the correct times here.
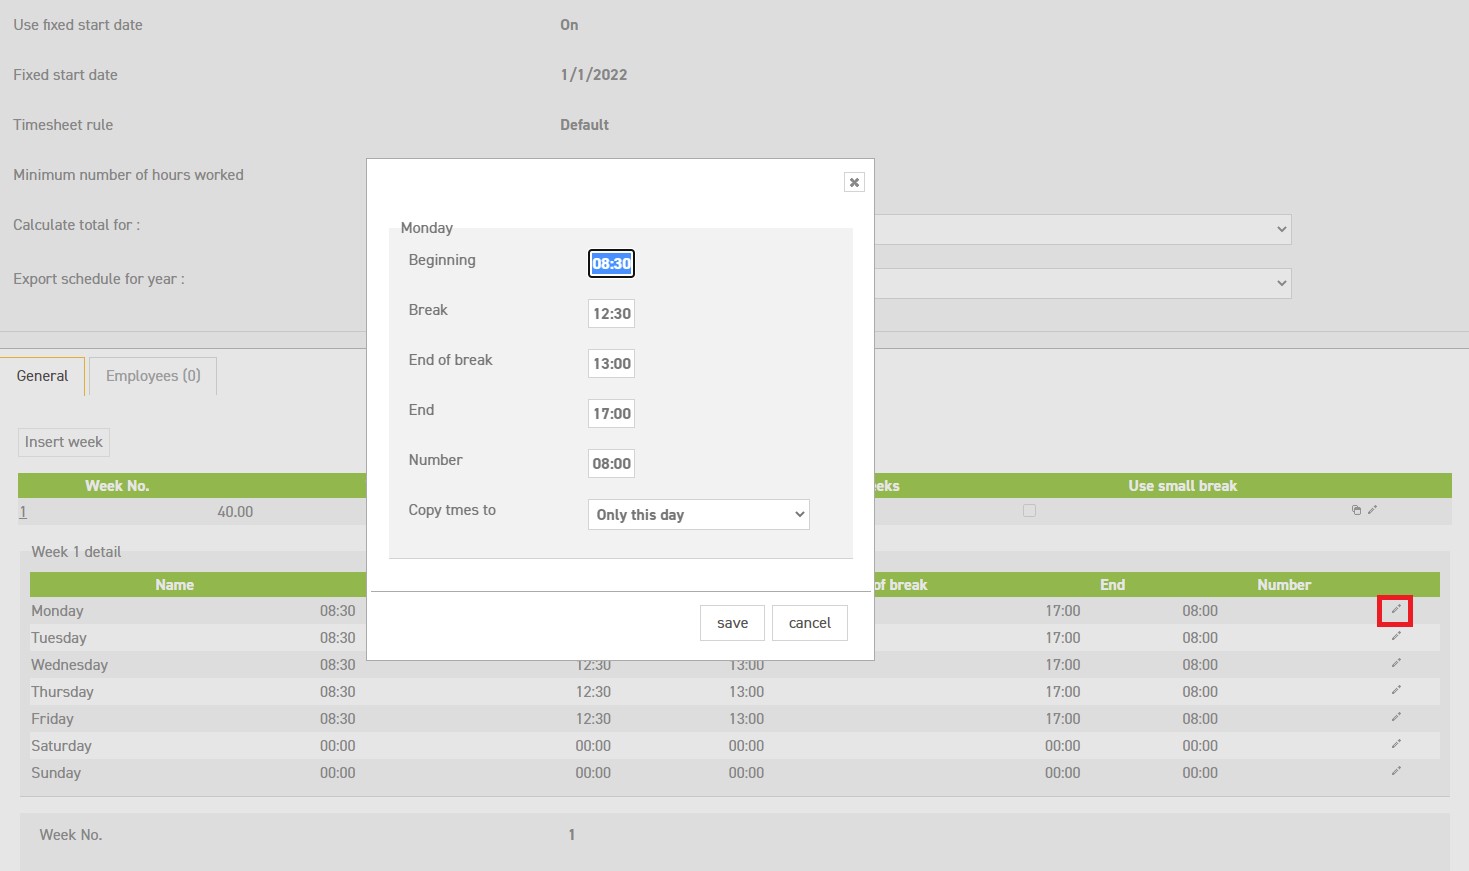
- Then you can fill in the times of all the days as you wish by selecting the pencil icon next to the day. Enter the beginning, break, and end time, and add the total number of hours.
In case there is a day when the employee does not work, fill in 00:00 everywhere. The system will then see this as a scheduled day off, just like the standard situation with Saturday and Sunday. These days will appear in the schedule as a grey box.
In case you change an existing schedule hit refresh (Ctrl + F5) after you save to calculate the right total number of hours in a week. Read more about adding small breaks here. - When it is a weekly recurring schedule, you only need to have one week filled in. When it concerns a schedule with multiple weeks, you can add more. Read about schedules of multiple weeks here.
Short workday without a break
It could occur that an employee only works half a day without a break. It is important that you then fill in the end time of the day at the ‘Break’ section, the ‘End of break’ section and the ‘End’ section.
Attention! Make sure that break, end of break and end (or beginning) are all set to the same time. This is necessary when there is no break in the day. When a request for leave is made, the system checks the beginning time and the end time that are entered here, whereby it deducts the duration of the break. The system recognizes 00:00 as 12 o clock at night, so filling that in would cause the request to be incorrect. For example: beginning: 09:00 | break: 13:00 | end of break: 13:00 | end: 13:00 | number 4:00)
Click here to read more about creating schedules with multiple different weeks.
Click here to read more about inserting small (coffee) breaks in the schedule.